

Introduction to PyTorch
PyTorch was released in early 2017 and has been making a big impact in the deep learning community.
It was developed as an open-source project by the Facebook AI Research team but is being adopted by teams everywhere in industry and academia.
As the creator Soumith Chintala mentions in the Facebook PyTorch Challenge with Udacity, one of their goals was to make it very usable and Pythonic, but at the same time as fast as other frameworks.
One of the consequences of this is that large parts of PyTorch are written in C++, and everything that is user-facing is written in Python.
This gives PyTorch the best of both the speed and usability worlds.
From Research to Production
Recently, PyTorch has become very popular in the research community.
This is mainly because the creator gave it to the research community and iterated on it before it became mature.
In addition to being research-friendly, the creators focused on making it relatively easy to deploy models from research to production.
In particular with the recent release of PyTorch 1.0, when you want your research to be production-ready, you can just add function annotations to your model.
PyTorch will then parse your model and make it into its own internal format that can be shipped to production.
In particular, it is converted into an intermediate representation (IR), which can then be run in any virtual machine that someone has built.
PyTorch and Facebook
PyTorch is supported by all the major cloud providers, although in terms of its relationship within the larger Facebook ecosystem, the creator said that:
Facebook does a lot of AI research and they need tools for its products, so if they are going to need these tools anyways it might as well make it an open-source investment.
The Future of PyTorch
Deep learning is becoming a very pervasive and essential component in many other fields such as healthcare, computational chemistry, neuroscience, etc.
All of these areas are starting to use deep learning, the creator says that their goal with PyTorch is to empower more researchers and businesses with specific packages that lower their barrier to entry to use the tool.
Stay up to date with AI
Deep Learning with PyTorch
Deep learning networks tend to be massive, typically with dozens or hundreds of layers.
We can build a deep neural network using only weight matrices, but in general, this is very difficult to implement.
To solve this, PyTorch has a module nn that provides a way to efficiently build large neural networks.
Network Architectures
At first, the network is naive and doesn't know the function mapping of its inputs to outputs.
We train the model by showing it examples of data and adjusting the parameters so that it approximates this function.
To do this, we calculate a loss function, which is a measure of our prediction error.
By minimizing the loss, we can find parameters where the loss is at a minimum using a process called gradient descent.
This allows the network to be able to predict the correct labels with high accuracy.
Backpropagation
With multilayer neural networks we use an algorithm called backpropagation, which is just an application of the chain rule from calculus.
When we pass in data to our network in the forward direction, we end up calculating our loss.
With backpropagation, we take each of the gradients of our network and pass them backward. At each step, we multiply the incoming gradient with the gradient of the operation.
Losses in PyTorch
Through the nn module mentioned about, PyTorch provides many different loss functions such as the cross-entropy loss with nn.CrossEntropyLoss.
Inference and Validation
After training our network, we can use it to make predictions.
This is referred to as inference.
To avoid overfitting while training, we measure the performance on data that is not in the training set. This is referred to as the validation set.
We avoid overfitting through regularization such as dropout.
Case Study: Neural Transfer Using PyTorch
Alright enough theory, let's look at an example of how we can use PyTorch to implement this Neural Style algorithm from this tutorial.
First, we are going to import the necessary packages:
from __future__ import print_function

import torchimport torch.nn as nn
import torch.nn.functional as F
import torch.optim as optim

from PIL import Image
import matplotlib.pyplot as plt

import torchvision.transforms as transforms
import torchvision.models as models
import copy
Next we choose the device to run the network on:
device = torch.device("cuda" if torch.cuda.is_available() else "cpu")Next we import both the style and the content image. The original images have values between 0 and 255, but when transformed into torch tensors, their values are converted to be between 0 and 1.
# desired size of the output image
imsize = 512
if torch.cuda.is_available() else 128 # use small size if no gpuloader

loader= transforms.Compose([ transforms.Resize(imsize), # scale imported image transforms.ToTensor()]) # transform it into a torch tensor

def image_loader(image_name):
    image = Image.open(image_name) # fake batch dimension required to fit network's input dimensions
    image = loader(image).unsqueeze(0)
	return image.to(device, torch.float)

style_img = image_loader("./images/picasso.jpg")
content_img = image_loader("./images/dancing.jpg")

assert style_img.size() == content_img.size(), \ "we need to import style and content images of the same size"
We then create a function that reconverts a copy of the image to PIL follow and then displaying it with plt.imshow
unloader = transforms.ToPILImage() # reconvert into PIL image

We then define our loss function by creating a ContentLoss function and a StyleLoss function.
We won't get into the full code here, but here are a few important points:
- We are going import a pre-trained neural network - a 19 layer VGG network like the one the authors originally used in their paper
- As the author suggests, we use a L-BFGS algorithm to run gradient descent
- Our goal is to train the input image to minimize the content and style losses
- Finally, we define a function that performs the neural style transfer
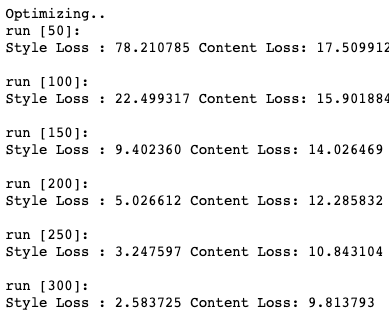
After we run the neural style algorithm we get the following image with neural style transfer. We can see that both the content and style losses are getting smaller with each 50 iterations:
Summary: PyTorch for Deep Learning
To summarize, PyTorch is an open-source deep learning platform and two of the main features of PyTorch include:
- Tensor computation with a strong GPU acceleration
- Automatic differentiation for building and training neural networks
With libraries like TensorFlow, you have to first define the computation graph before running the model.
With PyTorch, you can define your computation graph dynamically.
This makes PyTorch great for deep learning research as it provides a high degree of flexibility and allows for rapid prototyping.
This article was originally posted on 2019-04-13 and updated on 2022-12-14.


